


|  |
Multi-piece Overlapping
Foam Latex Prosthetics
|
|
BRIEF HISTORY
The multi-piece, overlapping, foam latex prosthetic appliance makeup routine is a rather long, drawn-out process which when rendered correctly though, can provide a more comfortable, better fitting appliance makeup. It was none other than makeup artist, innovator, teacher, mentor and friend, DICK SMITH, who improved upon the ONE-PIECE full-face mask that had been the norm for so many years.
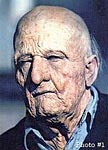 In 1969 when Dick developed the makeup of the 121 year old Indian character for LITTLE BIG MAN that Dustin Hoffman wore
(Photo # 1)
, he revolutionized the special makeup effects industry by coming up with the best alternative to the one-piece, full-face mask to that point. Makeup artists had relegated themselves to using one-piece masks for doing full-face appliance makeups, but they didn't fit well. Even though there were many multi-piece makeups done up to that point, normally they weren't overlapping and still had to be blended with other forms of makeup to cover what the appliances didn't. Dick was the first to come up with the idea of overlapping appliances that were created directly from a full sculpt. Since foam latex shrinks slightly as it dries, it therefore had to be stretched to apply and distorted the mask into an unnatural shape, often unlike the makeup they were trying to achieve with it in the first place. Dick eventually developed a better way. He chose to "split" the original clay sculpture, done on the full face or full head life cast, into numerous LOGICAL pieces that could be designed to overlap. He would then place these on individual sectional molds and cast them as separate appliances. That way the overlapping edges could blend imperceptibly with the adjoining piece. This allowed for more flexibility for the actor and took care of the "short-fit" of the one-piece, foam latex mask. In 1969 when Dick developed the makeup of the 121 year old Indian character for LITTLE BIG MAN that Dustin Hoffman wore
(Photo # 1)
, he revolutionized the special makeup effects industry by coming up with the best alternative to the one-piece, full-face mask to that point. Makeup artists had relegated themselves to using one-piece masks for doing full-face appliance makeups, but they didn't fit well. Even though there were many multi-piece makeups done up to that point, normally they weren't overlapping and still had to be blended with other forms of makeup to cover what the appliances didn't. Dick was the first to come up with the idea of overlapping appliances that were created directly from a full sculpt. Since foam latex shrinks slightly as it dries, it therefore had to be stretched to apply and distorted the mask into an unnatural shape, often unlike the makeup they were trying to achieve with it in the first place. Dick eventually developed a better way. He chose to "split" the original clay sculpture, done on the full face or full head life cast, into numerous LOGICAL pieces that could be designed to overlap. He would then place these on individual sectional molds and cast them as separate appliances. That way the overlapping edges could blend imperceptibly with the adjoining piece. This allowed for more flexibility for the actor and took care of the "short-fit" of the one-piece, foam latex mask.
Since Dick developed this routine, it has become an "industry standard" for these types of makeup. Artists all over the world have developed multi-piece appliance makeups using this technique. It has provided a way to deal with complex makeups and can utilize a variety of mediums, from foam latex, to gelatin and foamed gelatin, to silicone gel-filled appliances. While makeup artists all over the world have developed the actual methods which best suited their needs for "breaking down" the clay sculpture into the component parts they needed, the basic routine still remains the same.
THE ROUTINE
The routine of doing a multi-piece, foam latex prosthetic appliance makeup, presupposes that you are aware of the proper method of MOLD MAKING required to
accomplish it. However, I will touch on that method to give you an idea of what it takes to make molds that are properly prepared.
Obviously, one of the main starting points is the clay sculpture or makeup you create on the life cast of the person who will be wearing the makeup. Naturally, you first want to start with the best life cast you can achieve. This will make the "section molds" that are required to do individual appliances, that much better and make the whole process easier to do in the long run. If you don't know how to do a life cast, you should avail yourself of a book or treatise about how to do that first. You can try several online sites that explain and display the process.
 The process of taking sectional molds is a standard process, taking into account that you should make THOSE molds the best that you can also, since it will be these that you make the individual appliances on. If you dont know how to make "sectional" molds, then you can find that information in the following book by LEE BAYGAN: TECHNIQUES OF THREE DIMENSIONAL MAKEUP
(Photo #2)
It's probably the very best treatise on the subject for multi-piece, appliance makeup work and an all around great book with tons of information. This may be out of print at this time but you may be able to find it through book finders or used book dealers online.
The process of taking sectional molds is a standard process, taking into account that you should make THOSE molds the best that you can also, since it will be these that you make the individual appliances on. If you dont know how to make "sectional" molds, then you can find that information in the following book by LEE BAYGAN: TECHNIQUES OF THREE DIMENSIONAL MAKEUP
(Photo #2)
It's probably the very best treatise on the subject for multi-piece, appliance makeup work and an all around great book with tons of information. This may be out of print at this time but you may be able to find it through book finders or used book dealers online.
Essentially what it involves is defining the different "sections" you intend to create as individual appliance pieces, and then casting new positive casts of those areas from the full face life mask, making those castings as standard foam latex appliance mold positives. That can be done using alginate backed with plaster or plaster bandages and then creating the new positive cast, the same as you do any life casting.
What you will be doing is creating specifically selected section molds and not the whole face - with the exception of perhaps the larger neck and sides of face sectional mold that is very nearly as large as the life cast itself. Also if you ARE doing a head piece (or hands), then you must consider those molds as well, unless all you plan to do is use a bald cap to cover the hair. Otherwise, that would mean you'd have to have a full-head life cast made. HOWEVER, you must first decide how you intend to split the clay sculpture you plan to make before you do any sculpting at all on the life cast. THAT means you should have the makeup designed ahead of time on paper or in some other fashion (on a maquette or a computer design perhaps) so you know basically what it will look like and where the logical "splits" might come from when you move the sectioned clay sculpts from the full face life mask to the sectional molds. Or you can simply create those "logical" split points as you do the sculpting on the fly. But however you do it, it should be done to minimize or "hide" those split points - so "overlaps" (or "underlaps") in these areas could perhaps fall into a fold or wrinkle if possible or be on such a thin area of the sculpt so that when the two adjoining pieces are overlapped, the thin layers can blend together seamlessly.
Let me say that again, a more simple way. It sounds confusing I know. Simply put, after you DESIGN how you want to split the clay sculpt when you do it, do the following:
1. Take molds of the certain sections of the face required making new sectional positives
2. Do the clay sculpt on the full life cast
3. Split the clay sculpt into the "logical" sections that make sense
4. Move the clay pieces to the sectional molds
5. Clean them up and add the texture, lines and wrinkles, the overlap, the cutting edge and the overflow. Also you need keys to line the mold halves back up once created.
6. Make negatives of those sectional sculpts
7. Separate the two mold halves
8. Remove the clay from both positive and negative molds as necessary
 The resulting mold of each section you designed is ready to be filled with foam latex. It will consist of a positive and negative mold with space between where you had done the clay sculpting. This is where the foam "fills" the void between the two mold halves.
(Photo # 3)
The resulting mold of each section you designed is ready to be filled with foam latex. It will consist of a positive and negative mold with space between where you had done the clay sculpting. This is where the foam "fills" the void between the two mold halves.
(Photo # 3)
That is the watered down version and essentially that's the process. The work to get to that point is what takes the time.
WHAT ARE LOGICAL SPLITS ?
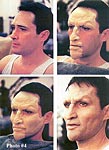 You may ask what I mean by "logical splits" when it comes to the clay sculpture you're doing on the life mask and which get moved to the sectional molds. Basically you want a MULTI-PIECE appliance makeup created.
(Photo # 4)
And that means you need to divide the overall sculpt into logical pieces that make sense. As an example, when Dick Smith did the LITTLE BIG MAN sculpt, he divided the whole thing into roughly, nine (9) separate areas. Those pieces are divided for that makeup in a logical fashion, though there are other ways to divide a sculpt such as that. It's just a matter of figuring out how you want to split it for your own purposes. Dick's sculpt was split as follows: upper eyelids-brow (2); nose and upper lip; lower lip and chin; sides of face and neck; ears (2); lower eyebags (2); forehead; back of head and neck; shoulder hump. Along with those Dick also created back of hand appliances for the hands (2 of those). So essentially there were 14 separate molds that had to be made - both positive and negative sides - or 28 mold pieces altogether. Obviously the ears, eyebags, eyelids, and hands each had two molds that needed to be made - a right and left side. And the head piece which consisted of the forehead piece (which included all the way down to the eyebrow line up to the middle of the head) was glued to and combined with the back of head and neck appliance that was made. You may ask what I mean by "logical splits" when it comes to the clay sculpture you're doing on the life mask and which get moved to the sectional molds. Basically you want a MULTI-PIECE appliance makeup created.
(Photo # 4)
And that means you need to divide the overall sculpt into logical pieces that make sense. As an example, when Dick Smith did the LITTLE BIG MAN sculpt, he divided the whole thing into roughly, nine (9) separate areas. Those pieces are divided for that makeup in a logical fashion, though there are other ways to divide a sculpt such as that. It's just a matter of figuring out how you want to split it for your own purposes. Dick's sculpt was split as follows: upper eyelids-brow (2); nose and upper lip; lower lip and chin; sides of face and neck; ears (2); lower eyebags (2); forehead; back of head and neck; shoulder hump. Along with those Dick also created back of hand appliances for the hands (2 of those). So essentially there were 14 separate molds that had to be made - both positive and negative sides - or 28 mold pieces altogether. Obviously the ears, eyebags, eyelids, and hands each had two molds that needed to be made - a right and left side. And the head piece which consisted of the forehead piece (which included all the way down to the eyebrow line up to the middle of the head) was glued to and combined with the back of head and neck appliance that was made.  This way the headpiece became ONE piece instead of two before being applied.
(Photo # 5)
That allowed Dick to do the prepainting and hair punching on the whole headpiece before application. But it began as two molds - positive and negative sides - or 4 mold pieces. This way the headpiece became ONE piece instead of two before being applied.
(Photo # 5)
That allowed Dick to do the prepainting and hair punching on the whole headpiece before application. But it began as two molds - positive and negative sides - or 4 mold pieces.
There are other ways to split a sculpt as I said. Some makeups allow for the forehead and nose to be one piece. Some require that the nose be a separate mold by itself. Some require separate lip pieces while others combine them as with the nose and upper lip appliance or the lower lip with chin piece. It's just a matter of figuring out the logic of the splits for the intended purpose, realizing that the intent is to make the overall makeup more flexible thus more natural and to hide the split points where the original clay sculpture was divided into sections. And then you do the resulting molds to accommodate those splits. But there is no one correct way to do it. You have to figure it out at the time you are designing the makeup.
LET'S TALK MOLDS
 The
sectional molds you make MUST be the very best that you can make and they must be made properly to achieve the overlapping appliances you want to use. Mold making is a major art to be sure. If you're a mask maker, then you understand the basic concepts of mold making for masks. But when it comes to overlapping prosthetic makeup appliances, the mold making techniques are much more The
sectional molds you make MUST be the very best that you can make and they must be made properly to achieve the overlapping appliances you want to use. Mold making is a major art to be sure. If you're a mask maker, then you understand the basic concepts of mold making for masks. But when it comes to overlapping prosthetic makeup appliances, the mold making techniques are much more specific since you want edges which are so thin they effectively disappear when glued down - in most cases. Making masks allows you not to have to worry over thin edges because you're
making a mask, which is technically "generic" in fit and substantially thicker and larger overall. Foam latex prosthetic appliance makeups are "form fitting" to the actor from whose life cast they're made.
(Photo # 6)
On occasion, the foam latex appliances CAN fit other people of similar facial structure (Dick Smith did that for F. Murray Abraham's character in AMADEUS. Dick used his own forehead appliance on Murray for the old Salieri character he portrayed).
(Photo #7)
But you will never get the direct fit of pieces unless made specifically for an individual from their life cast. You can find foam latex appliances now on the web that are labeled "generic fit" but they will never fit exactly. And as such, you may have to do a lot of tweaking to get them to fit, to hide edges or to blend pieces together. Those are reasonably inexpensive but they aren't like the custom designed and fitted foam appliances you make directly from a wearer's life cast. Though they CAN work in a pinch. specific since you want edges which are so thin they effectively disappear when glued down - in most cases. Making masks allows you not to have to worry over thin edges because you're
making a mask, which is technically "generic" in fit and substantially thicker and larger overall. Foam latex prosthetic appliance makeups are "form fitting" to the actor from whose life cast they're made.
(Photo # 6)
On occasion, the foam latex appliances CAN fit other people of similar facial structure (Dick Smith did that for F. Murray Abraham's character in AMADEUS. Dick used his own forehead appliance on Murray for the old Salieri character he portrayed).
(Photo #7)
But you will never get the direct fit of pieces unless made specifically for an individual from their life cast. You can find foam latex appliances now on the web that are labeled "generic fit" but they will never fit exactly. And as such, you may have to do a lot of tweaking to get them to fit, to hide edges or to blend pieces together. Those are reasonably inexpensive but they aren't like the custom designed and fitted foam appliances you make directly from a wearer's life cast. Though they CAN work in a pinch.
When creating molds, you need to allow for the clay sculpture transferred from the full face or full head life cast, plus some room for overlap, a good "cutting edge" and ample overflow for excess foam run off. If you don't know what I mean by "cutting edge" I will explain. A CUTTING EDGE is an area just beyond where your clay sculpture ends and where the negative cast when made, will contact the positive mold, thus creating an edge that makes the foam tissue thin. On the left is the better cutting edge while on the right is a thick edge that probably wouldnt work well.
(Photo # 8a)
This cutting edge is created on the edge of clay (which is the overflow and is closest to where the clay sculpt ends) and is cut into the clay at a relatively sharp angle.
(Photo #8b)
What results is a spot where the two molds actually make contact effectively "cutting off" the foam latex at this very thin area.
(Refer back to Photo #8a)
The remainder of foam latex created by the overflow is known as FLASH and is removed before using.
(Photo # 9)
 If you make a mold with a bad cutting edge you wind up with edges which are too thick and will show quite easily once the appliances are on and made up.
(Photo #10)
Then it's a matter of hiding the thick edges however you achieve that if you even can. If you're doing overlapping appliance makeup's you simply can't get away with much at all if your edges are too thick. Then it's back to square one with new molds if need be. If you make a mold with a bad cutting edge you wind up with edges which are too thick and will show quite easily once the appliances are on and made up.
(Photo #10)
Then it's a matter of hiding the thick edges however you achieve that if you even can. If you're doing overlapping appliance makeup's you simply can't get away with much at all if your edges are too thick. Then it's back to square one with new molds if need be.
Molds are both positive and negative. The mask makers among the readers know what this means. Positive mold being a life cast or clay sculpture and a negative mold is what you get when you take a negative casting of your clay sculpture. Technically, some will argue over semantics about what a "mold" is. But the term is often used interchangeably by most mold makers. Mask makers could make single piece, foam latex masks that form fit the person whose life cast they're built on if they chose to. Though it's a little harder to do since the life cast would have to become the core mold
that can only be removed if you've done the negative in two halves - like a front half and a back half. But undercuts then become a major issue that you have to be aware of if you did. So it isnt as practical as pieces or separate appliances. Undercuts can lock mold halves together and destroy molds.  And they ARE a real consideration even when doing the overlapping appliance makeup routine. When you create a clay sculpt on any life mask or portion of a life mask, you always run the risk of creating undercuts if you aren't careful.
(Photo # 11) And they ARE a real consideration even when doing the overlapping appliance makeup routine. When you create a clay sculpt on any life mask or portion of a life mask, you always run the risk of creating undercuts if you aren't careful.
(Photo # 11)
MORE
ON THE ROUTINE
Let's go back to the routine for doing a multi-piece appliance makeup. Once you have a good life cast and have designed your makeup, knowing where the BEST places to "split" the sculpture will be, then you would begin your sculpting process. By the way, you CAN decide after you've done a clay sculpt where those BEST PLACES for dividing the sculpt might be. This is due in large part because your original design might change as you do the sculpting and change the split points by virtue of how you create the sculpture. If you can decide before however, it's a better idea to have that in mind. It keeps you working within the parameters of your original design. BUT before you do any sculpting, you will coat the life cast with several layers of ALCOTE allowing it to dry between coats. Alcote is a dental product used as a release agent when casting acrylic teeth on plaster casts. In this case however, you use the ALCOTE
on the life cast before you do the clay sculpture so you can eventually FLOAT OFF the pieces of the clay sculpt once you've split it into the logical parts you intend for overlapping appliances later. Once the sculpture is complete and you've split it into it's component parts (this is done by using a hobby knife or thin piece of plastic or acrylic, and carefully making scores in the clay sculpture down to the life cast), you submerge the whole cast with the sculpt on it into a large tub of cool water, the water reactivates the ALCOTE and the clay pieces essentially "float off" of the life cast on which they're sculpted and are separate pieces.
 These pieces are then carefully transferred to their corresponding "sectional" molds, reapplied to those and finished out for casting negative casts for eventually running the foam appliances.
(Photo #12) These pieces are then carefully transferred to their corresponding "sectional" molds, reapplied to those and finished out for casting negative casts for eventually running the foam appliances.
(Photo #12)
Once you apply the separate clay sculpted pieces to their corresponding sectional molds, you will then work to create the overlaps with the detailing you want on the final appliance.  This means you have to add back in any texture, lines, wrinkles, etc. in a logical fashion that corresponds to the adjoining piece youll be gluing it to. This can get tricky but once youve done it one time you get the idea of how to accomplish it from then on. The negative molds with appropriate keys to line the pieces back up are then created and once set, you separate the new negative cast from the corresponding positive. You would then remove the clay from the positive. If necessary you would remove any excess clay from the inside of the negative as well. The resulting space between the positive and this new negative is where the foam latex will be injected or spooned in. (Refer back to Photo #3) This means you have to add back in any texture, lines, wrinkles, etc. in a logical fashion that corresponds to the adjoining piece youll be gluing it to. This can get tricky but once youve done it one time you get the idea of how to accomplish it from then on. The negative molds with appropriate keys to line the pieces back up are then created and once set, you separate the new negative cast from the corresponding positive. You would then remove the clay from the positive. If necessary you would remove any excess clay from the inside of the negative as well. The resulting space between the positive and this new negative is where the foam latex will be injected or spooned in. (Refer back to Photo #3)  The two mold halves are pressed together once again, pressing out the excess foam and finally the molds are placed into an oven and baked for a few hours till vulcanized.
(Photo #13)
The results should be individual foam latex prosthetic appliance pieces, which correspond directly to the actors face with tissue thin edges that literally disappear when glued down to the skin.
(Photo #14) The two mold halves are pressed together once again, pressing out the excess foam and finally the molds are placed into an oven and baked for a few hours till vulcanized.
(Photo #13)
The results should be individual foam latex prosthetic appliance pieces, which correspond directly to the actors face with tissue thin edges that literally disappear when glued down to the skin.
(Photo #14)
APPLICATION OF OVERLAPPING APPLIANCES
Naturally the method of application is directly relative to the manner in which the pieces should overlap only in reverse order - for the most part. Again, I refer to Dick Smith's LITTLE BIG MAN application and the method in which he applied those pieces since the order is often dependent upon how the overlaps were created.
Dick started with the upper eyelids which he created to blink naturally like any eyelid would.
(Photo #15)
The upper eyelids were made so thin, in an accordian-like fashion that blinking would be as natural as real skin would move. As well it covered the
eyebrow area too. Oddly, though, while Dustin did blink, it never appeared in the final cut of the movie at all. Lots of work to never get seen. Once the upper eyelids were applied, the nose-upperlip appliance was added. Then the lower lip-chin piece was next.
(Photo #16)
Obviously there are NO contact or overlap points to these pieces at all but they
still had to be created to overlap (or underlap in this case - the major piece which was applied over those).
And these preliminary pieces MUST be carefully applied so the tissue thin
edges disappear onto the skin so that when the major appliance that did overlap them, would not allow edges to show. Notice also, this is when the ears were applied as well. Next, the large sides of face-neck appliance was glued on.
(Photo #17)
THIS piece DID overlap the lower lip-chin piece AND the nose-upper lip appliance also. Therefore the edges of this piece had to be created with the overlapping in mind. They were thin edges that held the texture and wrinkling that the corresponding appliances had so that when the piece was glued down it blended right over those previously applied appliances. On the Old Salieri character in AMADEUS, he applied the forehead first
(Photo #7)
, then the sides of face and neck piece
(Photo #18)
- note that the sides of face and forehead did NOT overlap but later when the makeup is complete you STILL can't see where the edges are because they're so thin and the paint job is so well done. Then finally, the chin-lower lip piece and then the upper lip piece are applied.
(Photo #19)
By the way there was no nose piece done - just F. Murray Abraham's own nose, colored to match. So the order is how you intend it to be for flexability and sensibility for what you're doing. It DOES vary.
With the LITTLE BIG MAN makeup, just prior to the headpiece being applied, they applied a shoulder hump to give Dustin that "dowager's hump" look of old age so that the head and back of neck piece would glue down over that - though you don't see it because of his shirt.
(Photo #20)
It just gave him the slumped down look of old age. Finally the head piece was applied. As I said these were two appliances that were imperceptibly glued together so that the whole forehead-top of head piece and the back of head and back of neck piece became one appliance. (Refer back to Photo #5) It covered all the way down to the eyebrow area and blended in there just about the blinking eyelids. The under-eye bags had already been applied and sometime during the work, other assistants did the backs of the hand appliances
(Photo #21)
to finish out the makeup.
(Photo #22)
The application techniques that Dick teaches for appliances of this kind, is very precise and very exacting since the pieces must absolutely fit together so well that you cannot tell where the divisions are. It's an art-form to be sure. And not only does it mean that you have to have the edges precise and thin, so overlapping hides them, but you also have to have the ability to correctly color the appliances with makeup so that it takes on the look of real skin and blends exactly to the pre-painted or colored larger appliances (if you do it that way). Notice in Photo #19 previously, that Dick did NOT pre-paint the chin-lower lip appliance nor the upper lip appliance. But in Photo #23 you can see how well he has blended all the pieces together color-wise. It takes a good deal of artistry to take OPAQUE makeup and opaque appliances, PAX or paint of any kind and make it look TRANSLUCENT like real skin. That is where Dick is a master to be sure. Obviously, silicone, silicone gel-filled and often gelatin appliances already have a lot of that "translucent" look of real skin. Getting it on foam latex is another trick altogether.  Dick has learned and taught that you must LAYER the color on. Since skin is translucent, and since the pigmentation of real skin is so varied and often deep within the skin, you must observe and consider coloration, discoloration, blemish, or other anomolies of real skin and try to apply that to foam latex appliances and have it look real. Takes a good deal of practice to do that. Normally it takes three or more colors of makeup to do that. You'd begin with a base tone as close to the actor's real skin tone as you can get (or the character you're creating) and then stipple over that with other colors, veining under the skin and other skin imperfections or variances to make it look as real as possible. Also, highlight and shadowing colors are required - at least one shade lighter and one shade darker than the base color - at least. Then many more colors can be layered on top of those. It IS an art form in itself. Dick has learned and taught that you must LAYER the color on. Since skin is translucent, and since the pigmentation of real skin is so varied and often deep within the skin, you must observe and consider coloration, discoloration, blemish, or other anomolies of real skin and try to apply that to foam latex appliances and have it look real. Takes a good deal of practice to do that. Normally it takes three or more colors of makeup to do that. You'd begin with a base tone as close to the actor's real skin tone as you can get (or the character you're creating) and then stipple over that with other colors, veining under the skin and other skin imperfections or variances to make it look as real as possible. Also, highlight and shadowing colors are required - at least one shade lighter and one shade darker than the base color - at least. Then many more colors can be layered on top of those. It IS an art form in itself.
As for applying the pieces, he glues each piece from the CENTER and works his way outward. He glues each piece on in stages, constantly checking the fit, the overlap,
the alignment and so on - gluing the thin edges of each piece absolutely last. And it takes many hours to do that correctly. Standard time is about 4 hours but it can take as much as 10 hours to do. If I'm not wrong, I think when John Hurt did THE ELEPHANT MAN, it took Christopher Tucker 10 hours to apply it all. But THAT was a major makeup job to be sure with something like 27 pieces or something like that. A lot no matter what it was. So you have to be sure things line up properly and that everything is blended and finished to be totally invisible to the eye.
 However you would do the makeup you want to do, however many pieces you decide that are necessary to split the original clay sculpture into, however you intend to use the overlapping makeup, it is imperative that you have the best molds you can have, your overlaps are logical for your use, your edges are superbly created and thin, your application is painstakingly accurate and your finish work is without flaw. Doing these kinds of makeups is a major task as the preparation is long and drawn out. The mold making techniques are specific and you can wind up with many, many molds that might be required to accomplish what appears to be a reasonably easy makeup job
(Photo #24)
But whatever you do, use the best materials, techniques and processes you can to accomplish it and you'll be glad that you did. However you would do the makeup you want to do, however many pieces you decide that are necessary to split the original clay sculpture into, however you intend to use the overlapping makeup, it is imperative that you have the best molds you can have, your overlaps are logical for your use, your edges are superbly created and thin, your application is painstakingly accurate and your finish work is without flaw. Doing these kinds of makeups is a major task as the preparation is long and drawn out. The mold making techniques are specific and you can wind up with many, many molds that might be required to accomplish what appears to be a reasonably easy makeup job
(Photo #24)
But whatever you do, use the best materials, techniques and processes you can to accomplish it and you'll be glad that you did.
References:
Techniques of Three Dimensional Makeup by LEE BAYGAN
Watson-Guptill Publications
515 Broadway, New York, New York 10036
ISBN # 0-8230-5260-5
Making Faces Playing God
Identity and the Art of Transformational Makeup by THOMAS MORAWETZ
University of Texas Press, Austin, Texas
ISBN # 0-292-75246-6
Dick Smith's Advanced Professional Makeup Techniques Course
Copyright 1985 Richard E. Smith, Branford, Connecticut
(Available only by special invitation from Dick Smith)
Return to The Articles
|
|
|


|


